Installing a PROformance wall-mounted basketball hoop is a great way to save space while providing a stable, permanent area for play. Setting up your hoop properly ensures safety and durability.
Consult with our professionals by contacting us if you need any help along the way.
Always prioritize safety during installation, and follow these steps carefully.
Materials & Labor
- Wall-mount basketball hoop parts and hardware kit
- Drill with appropriate drill bits
- Wrench set
- Level
- Tape measure
- We recommend a total of 3 adults to help lift
Parts
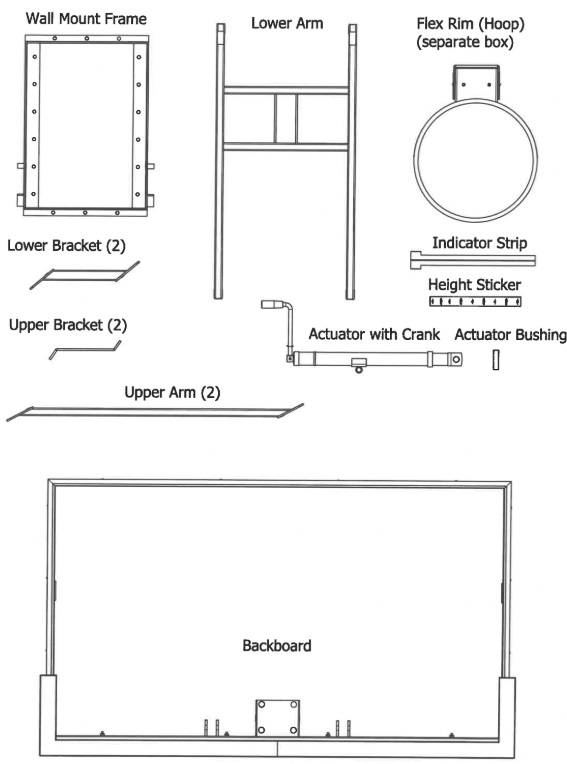
Ensure that you have the following parts
- Wall Mount Frame
- Lower Arm (2)
- Upper Arm (2)
- Lower Bracket (2)
- Upper Bracket (2)
- Flex Rim (Hoop) (in a separate box)
- Indicator Strip
- Height Sticker
- Actuator with Crank
- Actuator Bushing
- Backboard
Hardware
Ensure that you have the following hardware:
Nuts
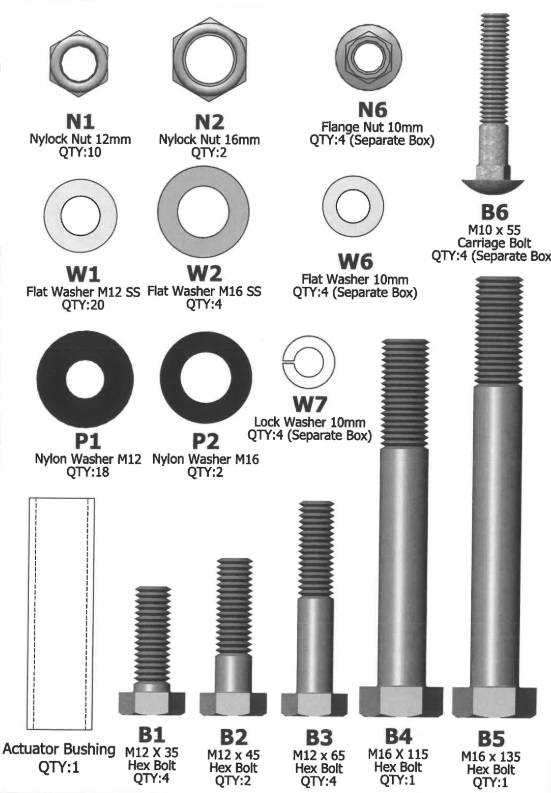
- N1 – Nylock Nut 12mm (Quantity: 10)
- N2 – Nylock Nut 16mm (Quantity: 2)
- N6 – Flange Nut 10mm (Quantity: 4, in a separate box)
Washers
- W1 – Flat Washer M12 SS (Stainless Steel) (Quantity: 20)
- W2 – Flat Washer M16 SS (Stainless Steel) (Quantity: 4)
- W6 – Flat Washer 10mm (Quantity: 4, in a separate box)
- W7 – Lock Washer 10mm (Quantity: 4, in a separate box)
- P1 – Nylon Washer M12 (Quantity: 18)
- P2 – Nylon Washer M16 (Quantity: 2)
Bolts
- B6 – Carriage Bolt M10 x 55 (Quantity: 4, in separate box)
Hex Bolts
- B1 – M12 x 35 Hex Bolt (Quantity: 4)
- B2 – M12 x 45 Hex Bolt (Quantity: 2)
- B3 – M12 x 65 Hex Bolt (Quantity: 4)
- B4 – M16 x 115 Hex Bolt (Quantity: 1)
- B5 – M16 x 135 Hex Bolt (Quantity: 1)
Frame Attachment
This type of basketball goal can exert a large amount of force on the wall structure where it is mounted. The wall structure must be strong enough to withstand this force.
First, locate the wall studs to determine where the mounting frame will be installed.
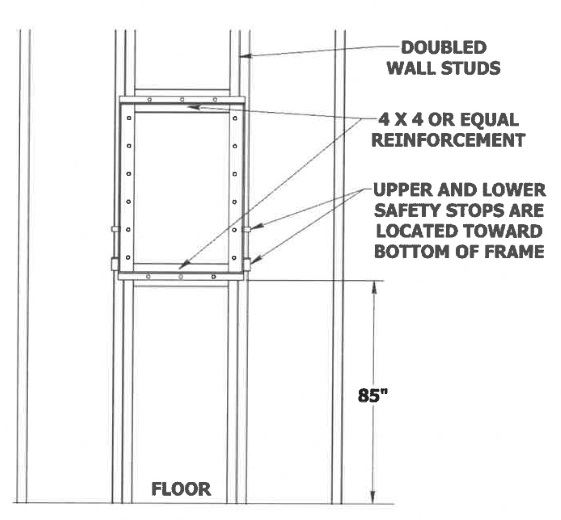
The basketball mounting frame is sized to take advantage of wall studs spaced at 16”. It is very important to note that your stud spacing may be different. Even if the spacing is 16” it is recommended that extra bracing be added to the studs. The illustration below shows reinforcing a stud wall like that which is used for framing a door or window. Prior to installation ensure the blocking is prepared at least as well. After proper wall reinforcement is complete, it can be covered with appropriate paneling and paint.
It is important to know that the hardware to mount the wall plate to the wall is not included. It is recommended that the frame be fastened with bolts that go all the way through the reinforced wall.
The maximum adjustable height of the basketball rim is 35” above the bottom of the wall frame. To achieve a 10’ rim height the bottom of the frame needs to be mounted 85” up from the floor.
- Using a level, mark vertical lines on the wall 16” apart that correspond to the reinforced wall studs and bracing.
- Mark a horizontal line on the wall 85” up from the floor.
- Position the wall frame with the bottom on the horizontal line and the mounting holes centered on the vertical lines.
- Mark the mounting holes needed for the attachment of the frame.
- Drill appropriate size holes as needed in the wall based upon the type of wall fasteners being used.
- Loosely attach the frame to the wall using appropriate fasteners.
- Level frame horizontally and vertically using a level and tighten fasteners appropriately.
Frame Assembly
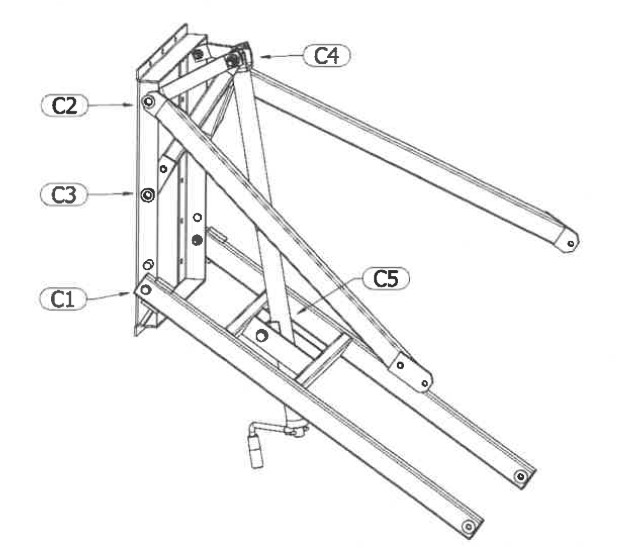
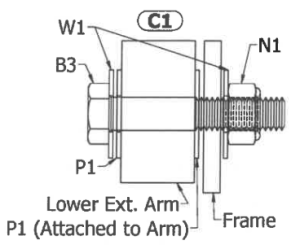
Connection C1
Align the rear holes in the Lower Arm with the lower holes of the Wall Mount Frame. Attach each side using one B3, two W1, one P1 and one N1. Another plastic washer P1 should be attached to the inside of the arm. Allow movement between parts. Do not over-tighten.
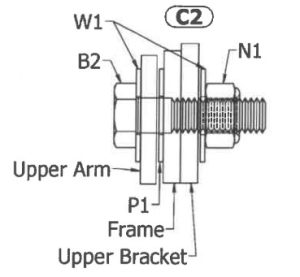
Connection C2
Attach the upper extension arms and upper mounting brackets to the frame. Each connection uses one B2, two W1, one P1 and one N1. Allow movement between parts. Do not over-tighten.
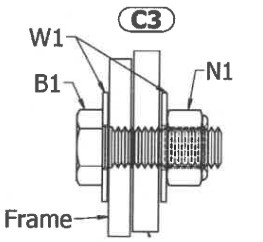
Connection C3
Attach the lower mounting bracket to the frame. Each connection uses one B1, two W1 and one N1.
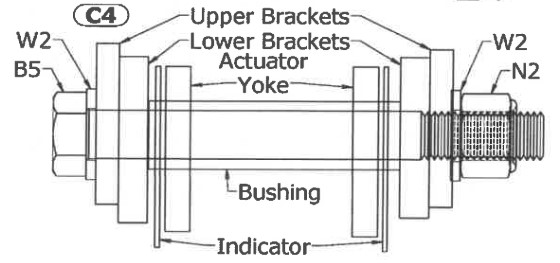
Connection C4
Insert the bushing through the actuator yoke and the indicator strip. Insert bolt B5 through a W2, an upper and lower bracket, the bushing with the indicator and actuator, the lower and upper brackets on the other side, then finish with a W2 and N2.
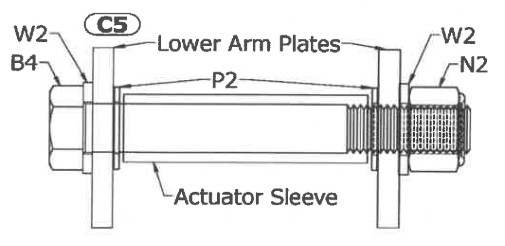
Connection C5
Attach the lower mount of the actuator assembly to the lower extension arm. This connection uses one B4, two W2, two P2 and one N2. Do not over-tighten.
Backboard Attachment
Connection C6
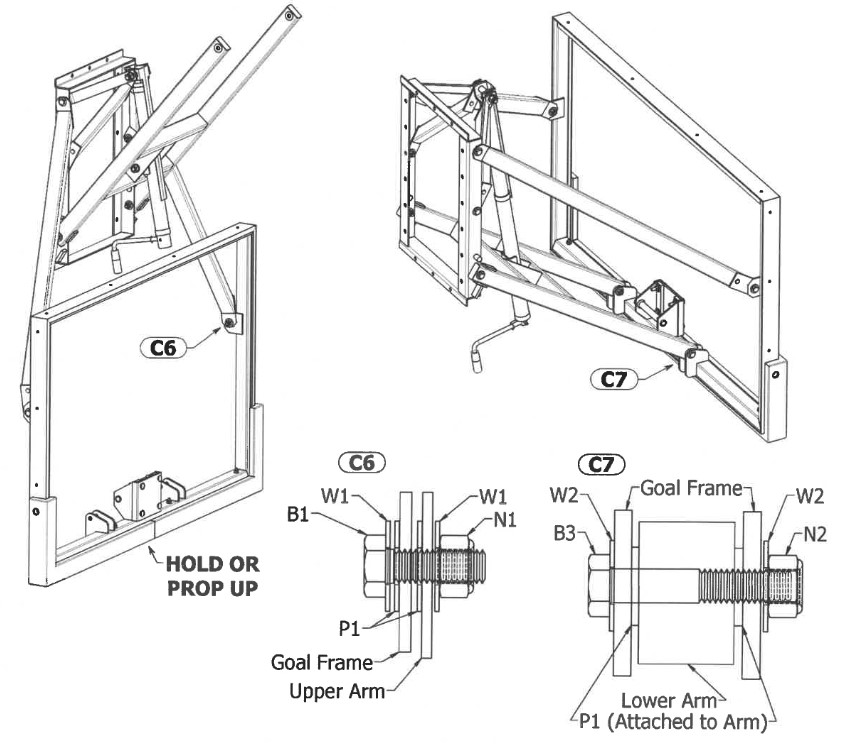
Using the actuator, crank the lower arm to a high position. Allow the upper arms to stay down. Carefully lift and support the backboard and align the upper backboard holes with the upper arm holes. Each connection uses one B1, two W1, two P1 and one N1. Allow movement between parts. Do not over-tighten.
Connection C7
Raise and support the backboard to a higher position. Using the actuator, crank the lower arm to a lower position, aligning the lower backboard holes with the lower arm holes. Each connection uses one B3, two W1, two P1 (which should be already on the arm), and one N1. Do not over-tighten.
Rim (Hoop) Attachment
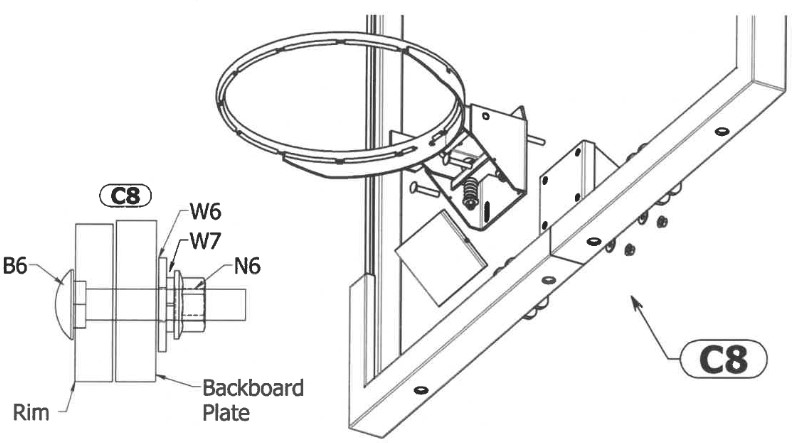
Connection C8
Remove the cover plate from the underside of the rim assembly. Put the rim against the backboard and align the holes. Attach with four B6, four W6 and four N6, making sure the rim is straight and level. Tighten completely. Replace the cover plate.
Rim Height Sticker Adjustment
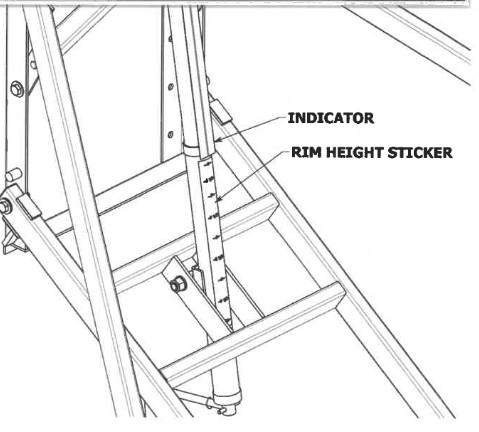
- Raise the backboard assembly until the rim is 10 feet high above the floor.
- Make a mark on the actuator in line with the bottom edge of the indicator.
- Lower the backboard assembly all the way.
- Peel off and apply the rim height sticker to the actuator, lining up the 10′ line on the mark previously made.
You’re done!
We hope you enjoy your newly installed wall-mount basketball hoop for years to come.

